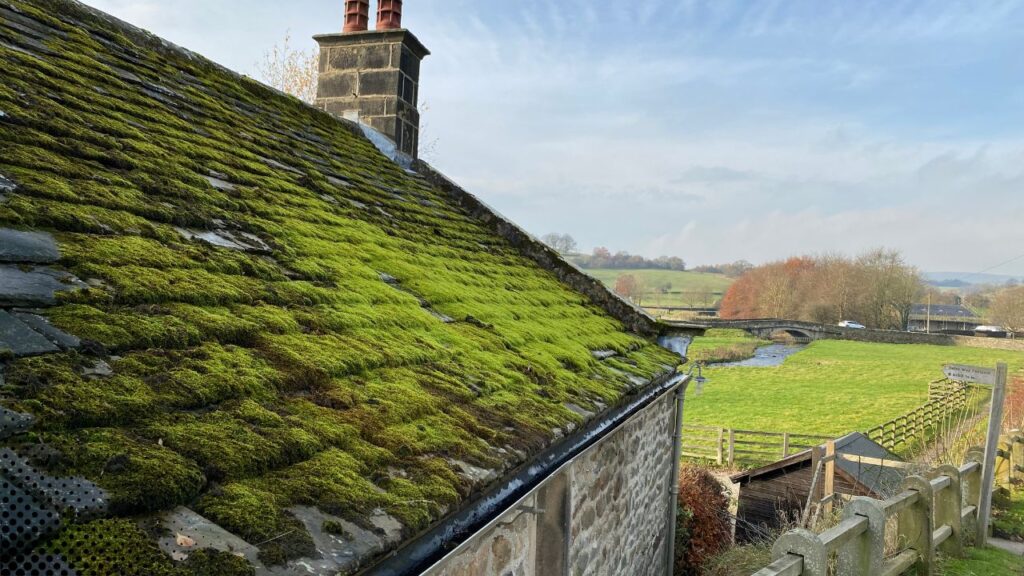
Moss might add a picturesque look to a forest cottage, but when it begins growing on your roof, it becomes more of a problem than a charming detail. Moss retains moisture, can lift shingles, and may shorten the lifespan of your roof. If you’re a homeowner noticing green patches on your shingles, understanding how to remove moss from a roof is essential to protecting your property and ensuring long-term structural health.
In this guide, we’ll explore safe and effective methods for moss removal, preventive strategies, and when to call a professional like Redding Roofing Company for expert care.
Why Moss on the Roof Is a Serious Issue
Moss thrives in damp, shaded environments. If your roof doesn’t get much sunlight, especially under trees or in cooler climates, it may become a prime location for moss growth. While a little bit of moss might seem harmless, over time it causes the following problems:
- Traps Moisture: Moss holds moisture against the roof surface, accelerating wear and increasing the risk of leaks.
- Lifts Shingles: As moss grows, it can lift or dislodge shingles, exposing your roof to wind damage and rainwater intrusion.
- Promotes Rot and Mold: Prolonged dampness encourages the decay of roofing materials and may spread mold to your attic and home.
That’s why timely moss removal from your roof is critical—not just for appearance, but for structural protection.
How to Remove Moss from a Roof: Step-by-Step Instructions
Learning how to remove moss from a roof doesn’t require expensive tools or advanced skills, but it does demand care, especially when working at height. Here’s a safe and practical approach:
Step 1: Prepare Safety Equipment
Before starting any work, prioritize safety. Wear non-slip shoes, use a sturdy ladder with stabilizers, and consider a safety harness if your roof has a steep pitch. If you’re not confident with heights, skip the DIY and contact a professional roofing company.
Step 2: Gently Remove Loose Moss
Using a soft-bristled brush or broom, gently scrape off moss by brushing downward along the slope of the roof. Avoid using high-pressure washing or scraping upward, as this may damage your shingles or roof tiles.
Step 3: Apply Moss Killer Solution
Use a moss removal solution available at most home improvement stores. Choose a product specifically made for roofs and safe for nearby vegetation. Apply the solution using a garden sprayer or watering can, saturating the moss-covered areas thoroughly. Let it sit for 15–30 minutes, or as instructed by the product manufacturer.
Alternatively, for a homemade mix, combine 50% water and 50% white vinegar or bleach (never mix chemicals together). Apply it in the same manner and allow time for it to kill the moss.
Step 4: Rinse and Inspect
After the solution has had time to work, gently rinse the area with a low-pressure garden hose. Avoid power washers, as they can strip roofing granules or damage tiles. Once rinsed, inspect the roof for any damage or moss regrowth areas.
This method covers the essentials of how to remove moss from a roof, but remember, prevention is equally important.
Preventing Moss Growth on Your Roof
Removing moss is only part of the solution—preventing it from returning is key to a long-lasting roof. Here are a few preventative strategies to reduce or eliminate future moss growth:
- Trim Overhanging Branches: Allowing more sunlight onto your roof will keep it drier and less moss-friendly.
- Clean Your Gutters: Clogged gutters can cause water to back up and saturate roof edges, encouraging moss.
- Install Zinc or Copper Strips: Metal strips installed near the ridge of your roof can help prevent moss. Rainwater running over these strips releases metal ions that inhibit moss growth.
- Annual Roof Inspections: Regular checkups by professionals help catch early signs of moss or roof wear before they become major issues.
Preventive action, combined with periodic maintenance, can greatly reduce the need for repeat moss removal from your roof.
When to Call in the Professionals
While DIY methods can be effective, there are times when professional moss removal is the safest and smartest choice. Consider hiring roofing experts if:
- Your roof is steep or multi-story
- Moss has penetrated under shingles
- There is extensive growth over large areas
- You suspect roof damage due to moss
Professional roofing companies have the experience, tools, and safety gear needed to complete the job thoroughly and without risk to you or your property. In addition to safe removal, they can also advise on roof condition and recommend long-term prevention strategies.
Eco-Friendly Moss Removal Options
Concerned about the environment? Many homeowners are turning to eco-friendly moss removal alternatives. Look for biodegradable roof cleaners that are free from zinc sulfate or bleach, which can be harmful to nearby gardens and waterways.
Manual removal paired with natural deterrents like baking soda, vinegar solutions, or even essential oils (like tea tree) can also reduce environmental impact while still effectively addressing the issue.
Moss on your roof isn’t just an eyesore—it’s a warning sign. If left untreated, it can lead to long-term roof damage, leaks, and costly repairs. Learning how to remove moss from a roof empowers homeowners to take preventive action and maintain the longevity of their home’s most critical structure.
Whether you opt for a DIY approach or prefer professional support, don’t delay your efforts. Regular inspections, safe cleaning practices, and proper drainage go a long way toward protecting your roof for years to come.
And remember, when in doubt or if the job feels too risky, calling experts can save time, money, and peace of mind. Proper moss removal from your roof ensures your home stays safe, dry, and beautiful—just the way it should be.